By Nicola Ogilvie, Just Sew
The school summer holidays are nearly upon us. For those of us with children this means long days in the sunshine at the pool or the lake, long walks in the mountains, holidays, visits home, or catching up with relatives - the pressures of school timetables relieved for a couple of months. Here`s hoping for a lovely sunny summer. But if the weather should be poor, even for a few days, the days can seem long, with too much screen time for children, be it endless cartoons, gaming or texting and face booking.
Why not get them off the screens and give sewing a go, children and teenagers both enjoy it! Its creative, fosters small motor skills and a completed project gives a great sense of satisfaction. Here are some great ideas to try at home.
For the very young, threading pasta shapes onto string, ribbon or wool is the very first step. You can paint the pasta, if you can cope with the mess.
For the next step, felt is great. When I am sewing with children, ages 5 to 8, I use Chenille needles, because they have big eyes, for easy threading but are sharp, unlike tapestry needles, so they easily pierce the felt. I also use cotton yarn that can be bought in Manor for less than 3chf a ball. I find this better than embroidery silks as they are a single strand. When teaching younger children teach them to push the needle through the fabric, pull the needle until all the thread is through then turn the piece over and then push back through the fabric. Repeat front, back, front, back. The most common error with children is to always sew from the top and the thread loops over the edge.


Pictured is a cute coin purse made from felt, a good first project. Simply cut 2 pieces as shown, be sure to decorate the front BEFORE sewing the 2 pieces together, I show an owl but I have had children make a cat, a fox, a monster, the options are as varied as their imagination. Try and incorporate the flap in the design by making it the nose or something similar. A button is then sewn on the front and a hole in the flap to close.
 For 8 to 10 year olds cushions are really popular. I use fleece blankets from ikea for fabric for cushions. They cost less than 4chf and the children love the soft surface, and they can be decorated any way they like. Again remember to decorate the front before sewing together. Ikea for pillow pads is very reasonable and for younger children the envelope style cushion is simple and effective. Cut 1 piece of fabric the size of the cushion and 2 pieces the width of the cushion and ¾ the length of the cushion. When the front is decorated lay face up on the table, place one of the back pieces on top, face down, lining up the edges so that it covers ¾ of the front, then lay the third piece, again face down, lining up the uncovered edge and overlapping the 2nd piece in the middle. Pin, then sew all around the square, and then the cushion cover is completed. This can be done by hand but is also a great starting project for using the machine.
For tweens and teens, its all about clothes. There is a host of simple sewing projects to be found on the internet: here are some of my favourites, with simplicity in mind. Convert an old shirt of dads into a summer dress, cut out the sleeves, cut off the collar and cut the bottom level if it has tails. Try on the shirt and mark your waist. Take a ribbon at least 2.5cm wide and pin it around the shirt at the point you marked for the waist, carefully sew close to the edge of the ribbon, thread in either some elastic or some thinner ribbon through the sewn in ribbon. If you have used elastic make sure it fits you around the waist and then secure each end. If you want the dress to be longer you can add some fabric to the bottom, either gathered or not.
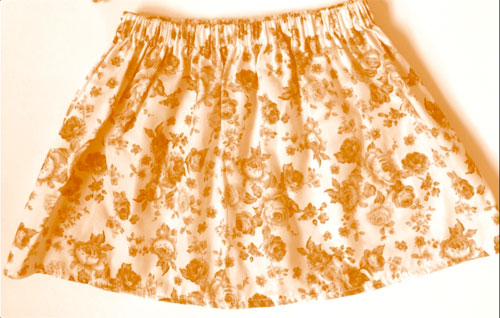
An elasticated skirt.
Measure around your waist, take this measurement and multiply by 2, this will be the width of your skirt. Measure the length you would like your skirt and add 8cm, this will be the length of your skirt. Cut a rectangle of fabric using your measurements.
Fold the fabric in half lengthways and sew together the open edges. This is the center back seam, iron the seam open. Fold over the top of the skirt firstly by 1cm and iron a crease in and then by 4cm and iron a crease in, pin in place. Sew around the top of the skirt close to the folded edge. Start 1cm after the center back seam and finish 1cm before the center back seam. This will be the opening that you will thread the elastic through.

Turn up a hem by turning 1cm under and then the 1cm again so there are no raw edges showing, iron and then pin and sew close to the crease edge.
Thread the elastic through the opening at the back seam, adjust to fit and then tie or sew the elastic ends together.
Or to get them started try one of my sewing workshops! In 1 day children who have never sewn before get an introduction to sewing with a machine and go home with their creations. Those who are more ambitious can try one of the more advanced workshops. See the full range of workshops on my website www.justsewgeneva.weebly.com
Author's bio
 Nicola Ogilvie has been sewing as long as she can remember, and loves new challenges. From a very early age, she has attempted most things you can make on a sewing machine, from creating her own wedding dress and recovering a chair to quilting and embroidery. In her early career, she was employed by Courtaulds, working in a factory making underwear for Marks & Spencer!
Through her sewing business, Just Sew, Nicola now shares her passion with a new generation. She runs workshops, mostly for children, and teaches in the after-school program of a local international school. She loves the fact that even the youngest get a great sense of satisfaction from their completed projects. After a number of requests, she will soon be offering courses aimed at adults.
Although sewing is clearly Nicola’s thing, she admires all craftsmen and women, and loves to see how people use their creativity.


